RagWing Special #312

Link to the RagWing site
A few things I am learning that you won't
find in the plans!
Including a little boat I built for my wife, it
was so much fun I built a slightly taller one for myself.. links to the plans
included
Please mail me if you have any questions, comments, suggestions or gripes!
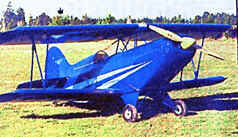
This is what a finished RW2 should look
like.. and it's in my color too!
Click the picture for the "official" "Ragwing Aircraft Design" (RAD) site.
Some other builders "Specials" click for larger size


Tom Jeschke's nicely finished bird

Dennis Frey's "Reds Baron" has a
style of it own

David Morrow shows us this plane is elegant in
the sky too

And Jeff Faith does a low pass on a hazy still morning
Carlos Gurr has a pretty detailed log with plenty of step by step pictures, I quite often take a peek for reference
Suppliers Links
Aircraft
Spruce
(Free Catalogue)
Page started 12/02/02
Last updated 07/30/11
This site has been designed and tested for 800x600 resolutions and upwards.
| Workspace |
Well, as I don't have a garage or decent shed.. this plane is going to be built in the basement! I know it wont be the first and it certainly wont be the last to be built that way, there are great merits to building in the basement... just never do anything with fiberglass!! ooo noooo!! But Again, I wasn't sure which way up to do this so I started at the bottom and worked my way up. Sounds logical but if you want to read this from the start, you need to go to the bottom of the page. Click here for a free ride down there. Wednesday April 16 2003 Here are a few shots of
progress and completion, as usual.. click on the picture to enlarge
it
I constructed this totally single handed but I would recommend when fitting the legs to bring a helper (assuming you do it the way I did). I installed the legs on one side whilst the bench was propped up against the wall, once they were screwed tight I let it down onto the 3 legs, then crawled underneath and lay on my back and with my hands and feet managed to lift the legless side up and prop it with another leg. This took 3 attempts.. as there is quite a bit of lumber to lift. In the end I kinda got mad and it WAS going to happen.. I think I heard every bone in my back crack as I took the weight.. feels great now :o) ..and once I managed to get one leg underneath it was easy getting the other legs in place. I think it bows in the center about 1/16" but with a spare piece of 1/16" ply under the middle leg it turned out great. I was tempted to go with 8 legs but I believed I could coax it into shape easier if it was not flat.. I was right too.. I have to say, had the floor been flat I wouldn't have needed the sliver of ply. (well I would say that wouldn't I???)
Saturday April 05 2003 Saturday
March 29 2003 I also plan on making a miter saw bench using the 4'x4' cut off from the bench surfacing wood.. I only have a rough Idea what I want but have sketched out a plan.. if it turns out ok I will put the plans on here.
Below is a picture of the basement as it was before I started planning anything. Big changes abound.. I need to clear stuff out, build the bench and arrange my tools At the start of this project we will only have been in the house 3 months so I think I did well to stake claim to this much space.. kinda functional but not too practical as it is here.
As soon as I finish my little Christmas project I will re-arrange everything. The bench (to be built yet) will go on the right and the power tools will go on the left. The center section will be to store the fuse when it is built and I will have the table saw in the middle at this end to give me more space for ripping the wood. I plan on blanking this end off to keep the dust away from my computer (just visible on the right there) and a door in the middle will allow me to rip long pieces. Ok, you have to use your imagination a little but it will be fine. |


